
Instructions - a Skippers Guide
 Step-1 Initial Setup
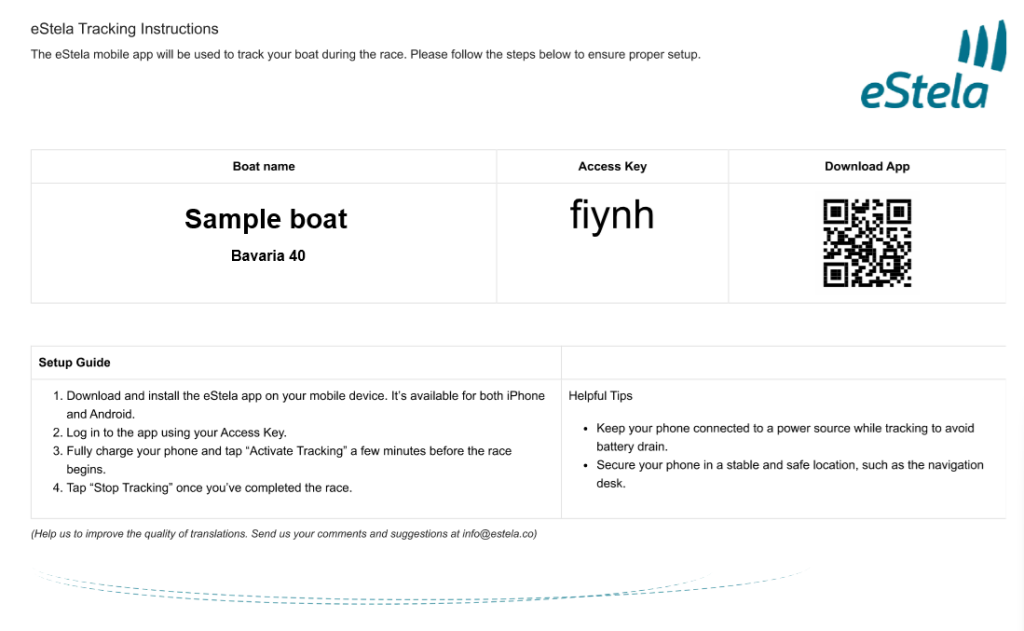
- After your initial entry, you will receive an email with the registering details.
- Download and install eStela on your mobile phone.
- The App is available at no cost for iPhone and Android.
- Login using your Access Key.
- You may need to set up a boat GPS tracking session. To do this, go to settings > Apps > eStela. In permissions ensure that location is allowed or allow all permissions. Check Location to ensure eStela is listed in the allowed apps. Make sure your device’s GPS system is turned on and functioning properly before starting the session and data is turned on.
Step-2 Check for latest version of App.
- The version can be seen on the bottom of the screen when the App is selected.
- Update from Settings > Apps. > eStela > App. details in store and "Update version" if requested.
- From same position above select Three dots (menu) and tick "Enable auto-update.
- Check that all permissions are selected.
Step-3 Before each race
- Charge your phone.
- Open eStela tracking app. and "Activation tracking" any time before your start.
- Select time duration or indefinite time depending on race.
- See GUIDE top right corner for information. 
- "Stop tracking" after you have finished. (Optional)
- Do not cross the starting line after activation till your start.
- Keep your phone on charge if possible while broadcasting.
- Place your phone in a fixed, safe place. For example, at the navigation desk. 

- Make sure your phone can receive satellites and has a data connection.
- Do not leave phone in your pocket.
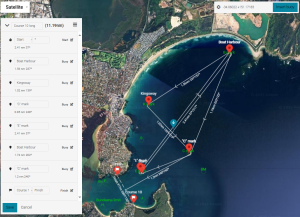
Step-4 Viewing races live
- From the warning signal (5 minutes before nominal start) races will be available. 
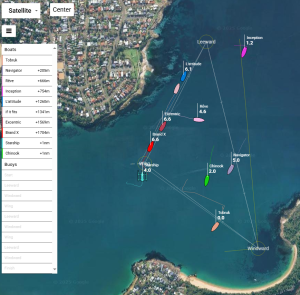
- Races can be followed live.
- After each race there may be some adjustments made to allow for actual mark and line positions.
- When any adjustments are made there is a lot of extra information including starting and finishing times, each boats tracks, performance information and so on.
As you sail, the Sail-tracker app will keep track of your boat's location, enabling spectators to follow your progress and enhancing the enforcement of sailing rules. It also ensures your security by providing real-time information on your location to the event organizers.
Step-5 Re-viewing of races
- Races can be re-run as often as required. See link to all races on the sailing home page.
- There may be a limit to how many past races we will hold.
- Races best viewed on full screen.
![]()
Setting Up a Race - An Administrators Guide
![]()
Whether you're a novice sailor or a seasoned professional, using a sail tracker such as the Sail-tracker app for regattas can greatly enhance your experience. It allows spectators to follow the race in real time, helps enforce sailing rules and ensures the security of participants. In this guide, we will walk you through the process of setting up a tracking session and direct you to the right places for more detailed documentation.
eStela Documentation See eStela Description To record track: Window+Alt+R/use menu icon to stop. (Video capture in MP4)
Step 1: Setup Yachts on Entry into Initial Race
- Enter each yacht from: Home>Fleet>New Boat.
- Each yacht's class should be chosen as TWI (only sails twilights), HBR (entered in boat harbour race), SO (entered in Short Ocean races) for races that all boats can race select "ALL" in the race setup process. This is so we can selectively allocate boats to simultaneously run races. (e.g. SO and HBR)
- A colour can be chosen to aid identification.
- MMSI can be used as a backup for the phones GPS.
- AUS needed as prefix to sail number.
- After each yachts setup the skipper can be sent instructions for the yachts tracking phone.
- After creation an "!" will show against each yacht and disappear when that yacht registers.
Step 2: Setup Frequent Waypoints from Handbook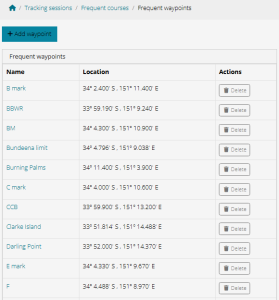
- Select: Home>Tracking Sessions>Frequent Courses>Frequent Waypoints
- The co-ordinates in the handbook are in Degrees and decimal minutes. Convert these to decimal degrees.
- Input all the relevant waypoints (marks) to aid course setting.
- To make changes - delete the old waypoints and re-enter.
- Having waypoints in the system greatly assists in creation new courses as the "Blue marker" will lock to the waypoint and the "Insert marker" will have the exact co-ordinates of the waypoint. (See set up courses following).
Step 3: Set Up Courses from handbook
- Select: Home>Tracking Sessions>Frequent Courses>Create Frequent Course.
- Name the course where if prompts "Example course".
- Place blue marker at the pin end of the starting line and "Insert mark". Mark will overlay the marker.
- Move marker to other end of starting line and "Insert mark". Can also be a turning mark.
- Edit the first mark and select "Gate". This will create the starting line.
- Move marker to first waypoint and "Insert mark".
- Continue using the blue marker to add all the marks of the course.
- The last two marks will be the ends of the finish.
- Edit the last mark and select "Gate".
- Save course.
Step 4: Setup Actual Races
Select: Home>Tracking sessions>Frequent course>find course>Use Course and input the following.
- Name: Wed. Twilight 19-Mar-25
- Course: Will be selected from bold above.
- Race Start Time: 2025-03-19 17-30-00
- Start Procedure: Standard for scratch start or Pursuit for timed starts.
- Save
Select: Scheduled Start
- Auto Start Tracking: Set time to the preparatory signal (5 minutes before start).
- Lasting Maximum: Set say 2 hours for twilight and 4 hours for Bate Bay.
- Save
Select: Set Tracking Fleet
- Choose: All for Wednesdays and Short Haul races, Choose SO for short ocean races and HBR for boat harbour races.
- Save
Select: Race details
- Check all data is correct and change if necessary.
- Save
- Copy race address to clipboard and update race page.
Select: Pursuit starts for pursuit starts
- Boats individual starting times are held in a .csv file.
- Select .csv file and upload times.
- Boats will automatically show 2 minutes before their start.
Step 5: Course Laying
 Initially the course for each race is set as above.
Using the "Use Phone GPS" facility you can-
- Be directed to each marks position to accurately lay marks
- Or by transferring the GPS co-ordinates from the "Use Phone GPS" app to your chart plotter, then your chart plotter can accurately position marks.
- The "Use Phone GPS" also allows marks to be moved on course and the new position to be updated on the web.
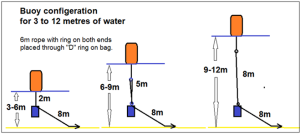
- Setting of anchor line to one of three possibilities to reduce buoy movement.
Step 5: Post Race Adjustments
Due to currents and wind the course marks may not finish up exactly where laid, so the marks of the course on the replay may need to be moved to ensure all boats pass on the correct side of the marks. Until this is done the times for starting, finishing and each mark may not be available. This is a simple process.